|
|
Miscellaneous
Animation Tips and Techniques - Part Four
|
 |
|
|
|
|
|
|
Tip No.
5
Use a vector drawing program to create the image frames.
Make the frames one at a time, duplicating the previous
one as you go.
Choose "anti-aliasing" when exporting frames
if smooth edges are desirable.
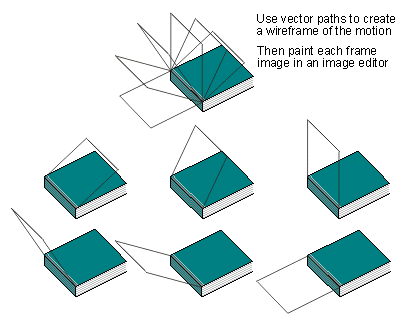
Click here for an example of using a vector drawing program to create animation frames.
You can still use a vector drawing program to rough
out the motion in an animation even if you plan to use
an image editing program to paint the frames.
Tip No.
6
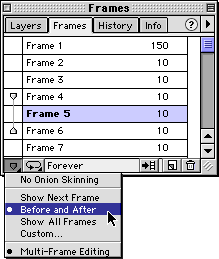
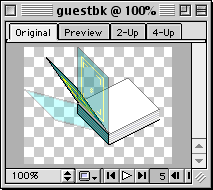
Some programs support "onion skinning".
This is a feature that makes adjacent frames appear
transparent so you can see more than one frame at a
time and help you line them up.
Below is a sample of onion skinning with Macromedia®
Fireworks®.
Activate Onion Skinning in the
Frames Panel |
You will see the effect in the
Document window |
|
|
 |
 |
Tip No.
7
Use a rectangle as a common frame of reference when
creating the frame images.
This way each frame image will be the same size. When
loaded into an animation program all the frames will
line up and all the motion will be relative to the same
space. If you don't use a common frame of reference
and export each frame image using only the objects in
the animation, you'll have no way to line them up.
If you don't want the rectangle in the finished animation
then use ImageReady or Fireworks or other program that
supports cropping to get rid of it. An animation program
that supports cropping, will crop all the frames at
once.
Tip No.
8
Use Adobe® Photoshop®
or ImageReady™ to resample images (ImageReady will
create animation frames from a layered Photoshop image).
Adobe Photoshop or ImageReady does the best resampling.
Tip No.
9
Crop and resample AFTER you assemble the frames, not
before.
If you use a rectangle as a common frame of reference,
wait until you assemble the frames before cropping or
resampling. Not all animation software supports cropping
and resampling.
Tip No.
10
When making an animation that contains text using fonts
- especially small text - use Adobe Illustrator®
to make the frames. Adobe Illustrator has the best text
rendering engine of all and small text will render very
legibly. Every graphic application renders text differently
- some better than others. Not all vector applications
were created equal. Don't create text in an image editor.
 |
The text in this animation was
rendered using Adobe Illustrator. |
Tip No.
11
Use a background matte color when making frames containing
anti-aliased objects and which have transparent backgrounds
(click here for what
a matte color is and how to use it).
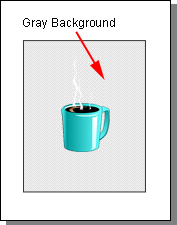
The frames used in the following animated GIF were
created in CorelDRAW®. The
background was set to gray because the animation was
to be displayed over a gray background. When each frame
was exported as a transparent GIF, CorelDRAW blended
the anti-alised pixels into the background color. In
this fashion, the background color functioned as a matte.
Click here for
the tutorial.
Tip No.
12
Take advantage of porting animations from one format
to another or from one program to another. Here are
links to some tutorials.
Porting
Animations Overview and Strategy
Animation
Software - Supported Features and Formats
Porting a QuickTime™
Movie To Jasc® Animation Shop™
Porting An ImageReady
Animation To Fireworks
Porting an AVI
Movie To QuickTime Format With ImageReady
|