Modify the preferences by clicking File > Preferences.
Here you will find the Preferences palette with 8 tabs.
The preferences shown below are only a small sample
of how you can make Deneba Canvas 6 work for you. These
are my personal preferences and most are used in these
tutorials. Bear in mind you can change these at any
time when a different set of circumstances would require
different preferences. Examples of exceptions are shown
below in red italics
so you get the idea. It pays to become familiar with
all these so the program will work predictably for you.
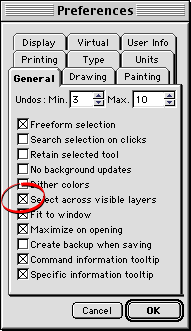
First, in the "General"
tab (below left), I like to check "Select across
visible layers". This comes in handy when you have
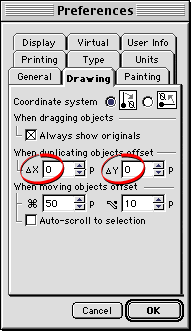
to select and align objects across layers. In the "Drawing"
tab (below right), I like to be able to duplicate an
object and paste it directly in front of the original.
For this preference I set the x and y coordinates to
zero in the "When duplicating objects offset"
section. Note: you can also
use Edit > Replicate using one copy with an
offset of zero and leave the default of 10 pixels in
this preference.
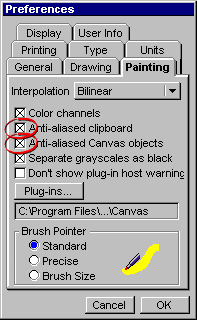
Next click the "Painting"
tab and check "Anti-aliased Canvas objects"
as well as "Anti-aliased clipboard" to make
sure selections and text objects will be anti-aliased
as a rule (see note below for
exceptions to this preference). Next click
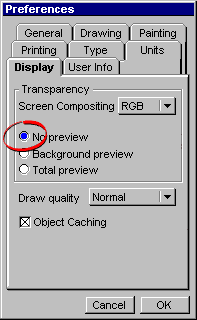
the "Display" tab and select the "No
preview" radio button so transparent pixels in
bitmap objects display by themselves with a checkerboard
pattern.
Note: There
are some situations where anti-aliasing would be
undesirable and where using hard-edges would be
better. Some things to be aware of...
1. During image editing anti-aliasing can leave
unwanted halos (artifacts) around selections. Be
sure to clean these up after moving or cutting a
selection.
2. It may better not to use anti-aliasing: a) with
rectangular shapes where edges run parallel to the
pixels or b.) when working with bitmap text using
outline fonts at small point sizes (e.g. 8 point
Arial) .