|
|
FreeHand®
Drawing Technique No. 5
Part B |
 |
|
|
|
|
|
|
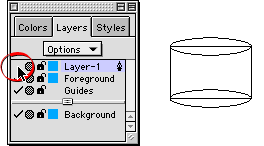
9. Choose "New layer" from the menu.
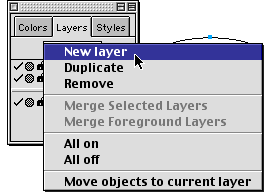
10. The new layer will be called "Layer 1"
by default. Click on the layer name (Layer 1) while
the top ellipse is selected. This will send the cloned
ellipse to Layer 1.
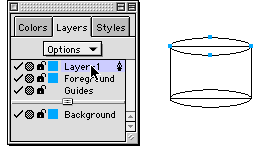
11. Next, click the check mark for Layer 1 to hide
it. Note that this ellipse is not selected. This is
because you are now looking at the original ellipse
in the Foreground layer.
 |
|
Note: This
is a very common technique when combining objects.
Many times you will need to preserve the original
object and its position. Simply clone the object
and send it to a new layer. Afterwards, you can
send the object back to its original layer if you
want. |
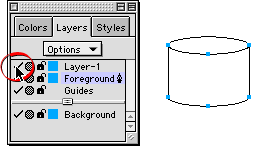
12. Double-click the Pointer tool and select the "Contact
sensitive" check box (FreeHand version 9 and up).
If you don't use the contact sensitive setting (or you
are using an earlier version) you will need to select
them individually while holding the Shift key. The two
objects are now selected (below center). Next click
Modify > Combine > Union (afterwards you'll
have to select the Foreground layer in the Layers panel
to bring it back to the Foreground layer). This combines
both objects into a single object (below right). While
this new object is still selected, click Modify >
Arrange > Send To Back. This object needs to
be below the ellipse in the stacking order for the next
operation to work properly.
13. Next, marquee-select all the objects (below left).
When you do, you will see that all objects are selected
(below center). Next, click Modify > Combine >
Punch. Your result should look similar to the example
shown below right. The "Punch" command knocks
the top object out of the bottom object. That's why
we made sure the ellipse was on top in the stacking
order.
14. Now click the check mark for Layer 1 to make it
visible again. You'll see the cloned ellipse made in
an earlier step.
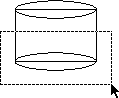
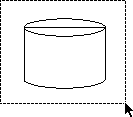
15. The cylinder is now complete (below left). You
can send the ellipse to the Foreground layer or leave
it on Layer 1 if you want. You can even add shading
to the cylinder for a more realistic appearance (below
right). I chose copper gradient fills for this example.
Creating metallic gradients is covered in another
tutorial.
|