|
|
| |
|
|
 |
| |
| |
|
Basic |
|
| |
|
|
Using
Clipping Paths In Photoshop® |
 |
|
|
|
|
|
|
A clipping path is a vector path which allows part
of an image to show while hiding the rest (usually its
background) effectively rendering part of the image
transparent. A clipping path in an image editing program
is functionally equivalent to a mask
in an illustration program (more).
A clipping path is a means to make parts of an image
opaque and parts of an image transparent. Usually it
is used to "knock out" the background. It
is also a way of changing the rectangular-shaped boundary
of a bitmap image into a shape of your choice. Clipping
paths are made with the pen tool in Photoshop. The path
itself is a vector object, while the image is a bitmap.
Together, the vector path and the bitmap image can be
exported as an EPS file - a file format which is capable
of having both vector and bitmap data in the same image.
The resulting EPS file can be placed directly into a
page layout document such as one created in QuarkXPress™
or Adobe® PageMaker®.
It can also be embedded (or linked) in a vector drawing
file such as one created with Adobe Illustrator®,
Macromedia® FreeHand®
or CorelDRAW®. The EPS file
can also be distilled into a PDF file (Adobe Acrobat®
Portable Document Format) with Adobe Acrobat Distiller™.
In all these applications the clipping path will knock
out the background of the image.
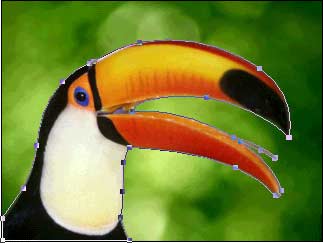
1. Let's make one. Below is a bird over a green background.
Let's cut out the bird. Then we can give the bird a
new background or simply place it over a plain white
background. This image was chosen because the subject
(the bird) is very smooth and curved making it an ideal
candidate for the pen rather than the selection tools.

2. First we use the pen to draw the path. Click the
Paths tab on the Layers Palette. Then click the "New
Path" icon on the bottom. The default path name
for the new path is "Path 1".

3. Draw the path with the pen. Try to place as few points
as possible, adding points only when necessary.
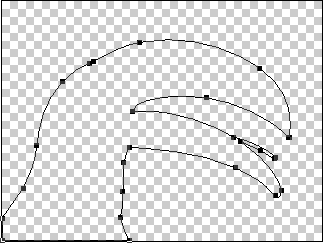
4. Below is a view of the path itself.
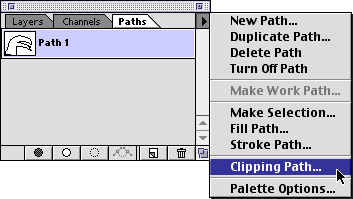
5. Photoshop allows more than one path to be embedded
in a file. There can be only one clipping path so you
have to assign which path is to be the clipping path.
In the path options menu, click "Clipping Path".
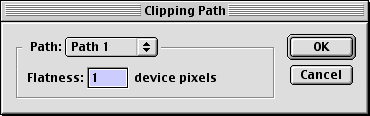
6. In the dialog choose "Path 1" to be the
clipping path. The flatness value determines how closely
the path conforms to the curves. The lower the number,
the more closely the path will conform to the curves.
Enter a value and click "OK"
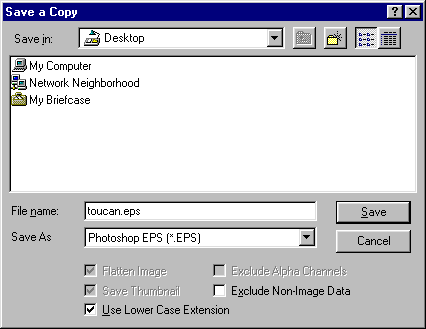
7. Next you need to save the file, then save a copy
as an EPS file. Click:
File > Save
followed by...
File > Save a Copy
Choose "Photoshop EPS" as the file type, then
enter a filename and click "Save".
8. Shown below is the effect of the clipping path.
The EPS file will print out like this on a PostScript®
printer. To see the effect of the clipping path on screen
you can open the EPS file in a drawing program (such
as Adobe Illustrator, CorelDRAW or Macromedia FreeHand)
or you can place the EPS file in a page layout program
such as QuarkXPress or Adobe PageMaker or you can distill
the EPS file with Adobe Acrobat Distiller and view the
resulting PDF file in Acrobat.

Note: If you open the EPS
file in Photoshop, you won't be able to see the effect
of the clipping path. To do so you either have to print
it out on a PostScript® printer
or view it on screen using one of the methods described
above.
9. For example, you can load an image into one of the
page layout or illustration programs mentioned above
to function as a new background...
10. Then you can drop the EPS image right over it.

|
|
|
|
|
| |
Previous
Home
Contact Mike
Related Sites
Next
Copyright
© 1998-2016 Mike Doughty, All Rights Reserved Legal
Notices
Page Last Revised: October 26, 2016
Privacy Policy
|
|
|
|
|
|
|
|