|  


           | 
         
         
          |   | 
           | 


           | 
            | 


                |   | 


                      |   | 
                        | 
                      Intermediate | 
                        | 
                     
                     
                      |   | 


                            |   
                             | 
                            Cool 
                              Transparent Text Effect in Photoshop® Part Two | 
                              | 
                             | 
                             | 
                           
                           
                             | 
                             | 
                           
                           
                             | 
                             | 
                           
                         
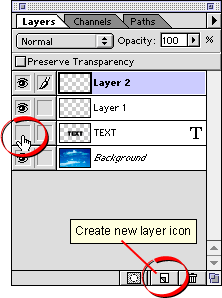
                        7. Next create two new layers. Either click the "Create 
                          new layer" icon twice (at the bottom of the Layers 
                          palette - circled below) or click Layer > New 
                          Layer... to create them. You don't need the text 
                          layer anymore so you can either hide it or delete it. 
                          In this case I chose to hide it. Just click the layer 
                          visibility icon (the icon that looks like an eye) on 
                          the far left of the text layer (circled below). The 
                          two new layers are named "Layer 1" and Layer 
                          2". 


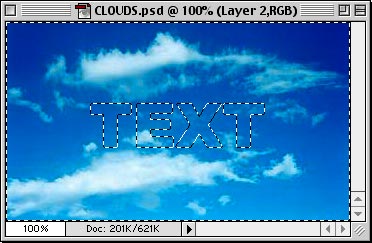
                          8. Here's what the selection looks like against the 
                          background image. 


                          9. Next, we want to select everything except 
                          the text, so click Select > Inverse or Cmd + Shift 
                          + I (Mac®) / Ctrl + Shift 
                          + I (Windows®). 


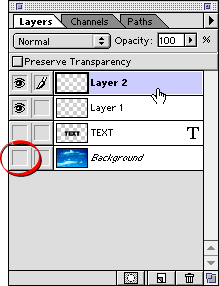
                          10. In the layers palette, temporarily hide the background 
                          image by clicking the visibility icon for the background 
                          layer (circled below). Then click one of of the new 
                          layers to make it the active layer. I chose Layer 2 
                          (below). 


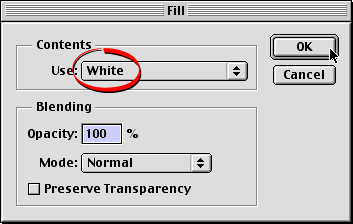
                          11. Click Edit > Fill. In the dialog, choose 
                          "White" from the "Use:" drop down 
                          of the Contents section. Set the opacity for 100%, Normal 
                          mode, then click "OK". 


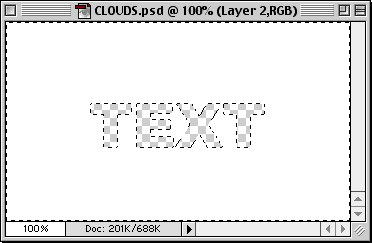
                          12. This is the result of the fill. Everything except 
                          for the text shape is white. 


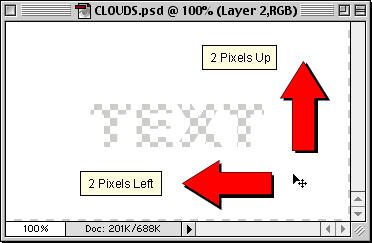
                          13. Deselect everything by clicking Select > Deselect 
                          or Cmd + D (Mac) / Ctrl + D (Windows). Then choose the 
                          Move Tool and nudge the layer 2 pixels up and 2 pixels 
                          to the left with the arrow keys. 


                              | 
                              | 
                            Note: Nudge 
                              the layer more if your image resolution is greater 
                              than 72 ppi or if you use a larger point size for 
                              the type. For example, if your image is 144 ppi, 
                              nudge the layer 4 pixels for 60 point type. If you 
                              chose 120 point type, then nudge the layer 4 pixels 
                              for 72 ppi or 8 pixels for 144 ppi.  | 


                          Click 
                          Here To Continue...  
                       | 
                        | 
                     
                     
                        | 
                        | 
                        | 
                     
                     
                      |   | 
                       
                         Previous 
                          Home 
                           Contact Mike   
                        Related Sites 
                           Next 
                         
                        Copyright 
                        © 1998-2016 Mike Doughty, All Rights Reserved Legal 
                        Notices Page Last Revised: October 26, 2016 
                        Privacy Policy 
 
                       | 
                        | 
                     
                   
                 | 
                  | 
                 
                  
				 | 
                   | 
               
             
           | 
         
       
     |