|
|
Quick
and Easy Gel Buttons in Canvas™ 7
Part Two |
 |
|
|
|
|
|
|
6. Make one last rounded rectangle and
refer to the screen shot below right for its size and
position. We need to apply a Gaussian Blur to this object
so click Object > SpriteEffects™ >
Add Effect > Blur > Gaussian Blur, and enter
1.9 pixels in the dialog.
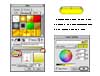
7. Using the Gradient manager give it a gradient fill
ink with white as the first color and the following
HSL values for the second color: (refer to the screen
shot below right)
H=60, S=100, L=40
8. Next we need to clip these objects
to give them a clean edge. To do this, we need to make
a duplicate of the bottom rounded rectangle and use
that as the clipping path. Duplicating this object will
place an exact copy on the top of the stack in the exact
same position as the original. This is a good technique
for making a clipping path. Start by selecting the bottom
object ("Object 1").
9. Next click Edit > Replicate.
In the dialog, choose one copy with no offset or scaling
(circled below). Click "Apply" when done.
The duplicate rounded rectangle will appear at the top
of the stack.
10. Using the Selection Tool, marquee-select
all four objects. Make sure to drag completely
around the SpriteEffects of the objects to which the
effects are connected.
11. Click Object > Clipping Path
> Make. This completes the gel button master.
Click
Here To Continue...
|