|
|
Canvas
6™ Technical Manual Project
Part 3E - Build The Document |
 |
|
|
|
|
|
|
Return
To Technical Manual Project Index
Most of the text formatting is finished, so now we
need to add the remaining graphic elements to the page
heads. These graphic elements must be created separately
on each page. Unless they are exactly the same
for each page, they cannot appear on the masters.
There is a circle with a chapter number which appears
on page one. If this were a multi-chapter document this
graphic element would appear on the opening page for
each chapter. All chapters should begin on a right facing
page and all right facing pages should be odd-numbered.
32. Pick a blank spot in the Layout area and using the
oval tool  drag out a circle. Use the Shift key while dragging
to constrain the shape to a circle.
drag out a circle. Use the Shift key while dragging
to constrain the shape to a circle.
33. Use Ctrl-Drag (Windows®)
or Option-Drag (Mac®) to duplicate
it. Remember to release the mouse before the
modifier key.
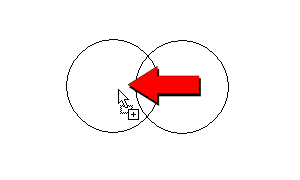
34. Shown below is the duplicate circle. It should
be on top of the other one in the stacking order.
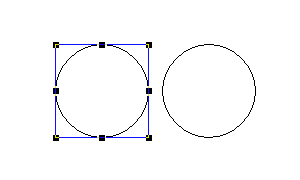
35. With the top circle still selected, bring up the
Transform palette. Click the button shown circled below
to proportionally constrain the width and height, then
enter a width of 108.63 points. Click the Tab key to
advance the cursor to the height box. Canvas will enter
108.63 for you.
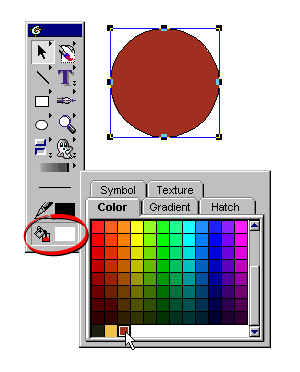
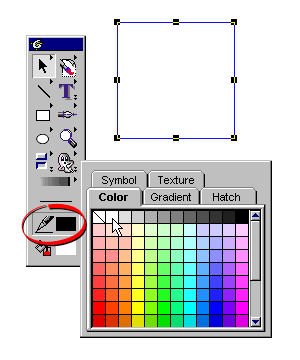
36. Next we will set the fill ink, the pen ink and
the stroke width. Using the Toolbox, click the Fill
ink icon. In the Color tab, click the tile for the new
maroon color.
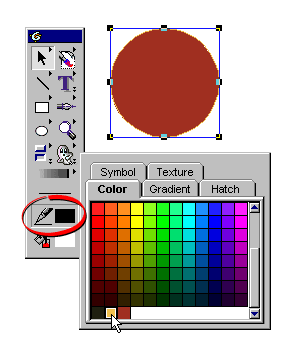
37. Next click the Pen ink icon. In the Color tab,
click the tile for the new gold color.
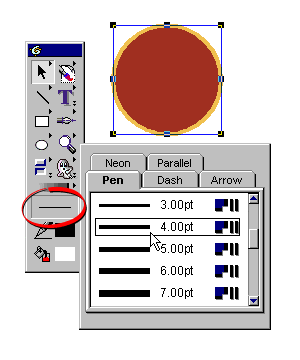
38. Next click the Strokes icon and in the Pen tab,
choose a 4 point stroke width.
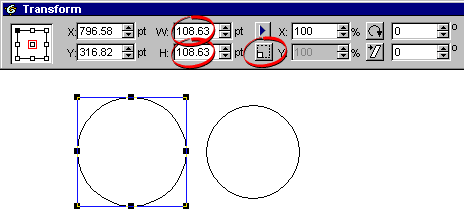
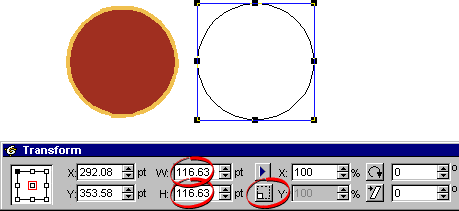
39. Select the bottom circle and bring up the Transform
palette. Make sure the the button shown circled below
is still displayed to proportionally constrain the width
and height, then enter a width of 116.63 points. Click
the Tab key to advance the cursor to the height box.
Canvas will enter 116.63 for you.
40. The circles were first created using a white fill
ink, a black pen ink and a stroke width of one point
- all defaults. At this point, change the pen ink of
the bottom circle to white. This is the larger of the
two circles and we want it to be all white and under
the other circle in the stacking order.
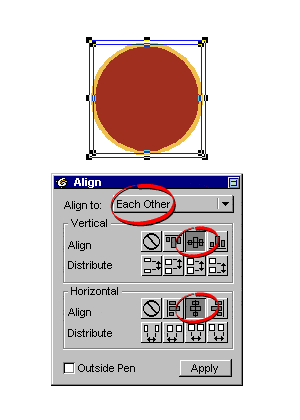
41. Now select both circles and click Object >
Align. In the Align palette choose align to "Each
Other" and click the buttons for aligning to horizontal
and vertical centers. Click "Apply" when done.
With both objects still selected click Object >
Group. Although grouping these two objects is not
essential, I do it out of habit to protect my work as
I go.
Click
Here To Continue...
|