|
|
| |
|
|
 |
| |
| |
|
Intermediate |
|
| |
|
|
Torn
Paper Effect For Web Page Backgrounds In Canvas™
6 - Part One |
 |
|
|
|
|
|
|
Many people have asked how to create a torn paper effect
for a web page background. I have experimented with
traditional image editing programs using selections,
but Deneba Canvas has some unique features which makes
the job easy and very flexible. The strategy here is
to use the Freehand tool to draw a jagged line, then
enhance it with the Fractalize effect. Then combine
this line object with a rectangle to produce the torn
edge swatch. That's not all. Using the Smart Mouse constraints
Canvas enables you to ensure that the swatch will tile
seamlessly when it is used as a background in a web
page. There's more! The swatch is a vector object and
can be reused over and over by applying not only color
inks but also texture inks - perfect for paper textures!
Read on and find out how.
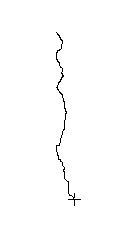
1. First select the Freehand tool  and draw a rough line on the Layout area (below left).
When you release the mouse the line looks like the one
below right. Don't worry how it looks at this stage
(see note in next step).
and draw a rough line on the Layout area (below left).
When you release the mouse the line looks like the one
below right. Don't worry how it looks at this stage
(see note in next step).
 |
 |
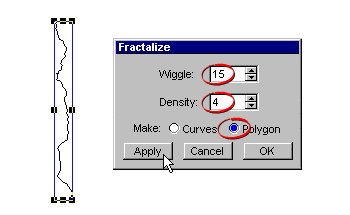
2. Click Effects > Fractalize. In the dialog,
enter a Wiggle factor of 15, a Density of 4 and "Make
Polygon". Click "Apply" then "OK".
Note: You can stretch, contract,
rotate and otherwise distort the line before or after
applying the Fractalize effect. Not only that, you can
repeatedly click the "Apply" button until you
are satisfied with the appearance of the line so don't
put too much attention on drawing the line perfectly in
step 1.
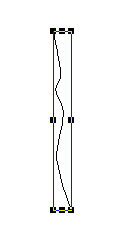
3. Next draw a small rectangle 100 points wide by about
120 points high. Give it a fill color. Next click Layout
> Smart Mouse to bring up the Smart Mouse dialog.
Click only the Object Edges constraint button.
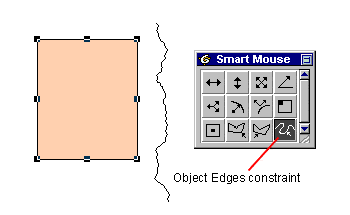
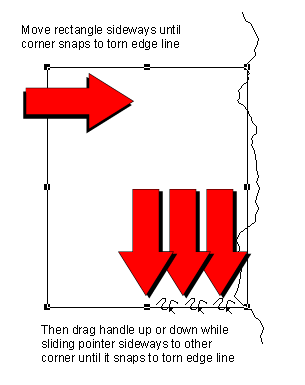
4. The top right corner of the swatch must mate to the
bottom right corner of the swatch in order for the background
to tile seamlessly. When the two objects are combined,
both right hand corners must intersect with the jagged
line. Move the rectangle up and down the jagged line until
you have a close match. Using the Object Edges constraint,
only one of the two corners will intersect when the rectangle
snaps to the line. It can be either the top or the bottom...it
doesn't matter. In order to make the opposite corner of
the rectangle intersect along the same vertical line,
you start by dragging the center handle up or down (depending
on which way the line has to move), then slide the mouse
pointer sideways towards the corner until it snaps. You
will see the Object Edges pointer while doing this (below).
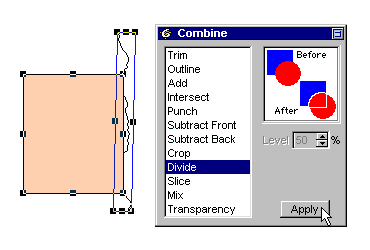
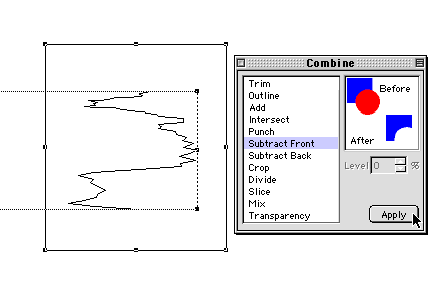
5. Next select both objects and click Effects >
Combine. In the dialog, choose "Divide"
then click "Apply".
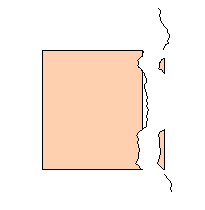
6. Separate and delete the pieces having straight edges
that face away from the swatch as well as the end pieces.
Be careful not to disturb the other pieces.
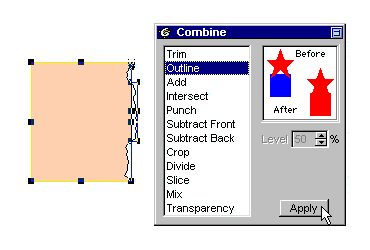
7. With the Combine palette still open, marquee select
all the objects and choose "Outline", then click
"Apply". That will merge all the objects into
a single object.
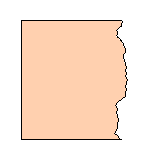
8. The finished swatch object will look similar to the
one below. It is shown with a black pen ink for clarity.
Give it a pen ink of "No ink".
9. There are two more objects to go - a 1000 point wide
rectangle to make the background image tile vertically
in web pages, and a shadow for depth. We need the 1000
point wide rectangle directly under the swatch having
the same height and x / y coordinates as the swatch. This
is so when we render the image it will be a single rectangular
object 1000 pixels wide. Click Edit > Replicate
one copy with no offset, then select the bottom object
and drag the right side handle to stretch it. Give it
a fill of "No ink". Next chop the end off by
making a new rectangle overlapping the right end, then
select both rectangles and choose "Subtract Front"
in the Combine palette.
Note: As long as you are rendering
over a white background the "No ink" fill will
render as white in the final image, but will allow transparency
for the shadow to show through when placed underneath
it.
Click
Here To Continue... |
|
|
|
|
| |
Previous
Home
Contact Mike
Related Sites
Next
Copyright
© 1998-2016 Mike Doughty, All Rights Reserved Legal
Notices
Page Last Revised: October 26, 2016
Privacy Policy
|
|
|
|
|
|
|
|