|  


           | 
         
         
          |   | 
           | 


           | 
            | 


                |   | 


                      |   | 
                        | 
                      Intermediate | 
                        | 
                     
                     
                      |   | 


                            |   
                             | 
                            Defringing 
                              Unwanted Halos In Photoshop® 
                              Part Three | 
                              | 
                             | 
                             | 
                           
                           
                             | 
                             | 
                           
                           
                             | 
                             | 
                           
                         
                        5. Accept the default width of 1 pixel in the subsequent 
                          dialog. 
                          
                        6. There is some improvement, but the fringe pixels 
                          were completely opaque (having no transparency) so the 
                          defringe command produced a jagged edge. Ideally we 
                          need to make the fringe pixels partly transparent, then 
                          reapply the defringe command. Click Edit > Undo 
                          to reverse the command and revert the layer to its previous 
                          state.  
                          
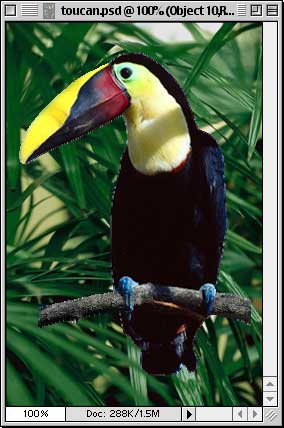
                        7. We are going to duplicate the layer containing the 
                          image of the toucan because we want to work on a copy 
                          of the layer in case we make a mistake. The quickest 
                          way to do this is to use the Layers palette and drag 
                          the layer onto the "New Layer" icon at the 
                          bottom of the palette (below left). Then hide all other 
                          layers either by clicking their visibility icons to 
                          the left of each layer or by Opt/Alt clicking the visibility 
                          icon of the new layer (below right). Make sure that 
                          the new layer copy is the active layer (highlighted 
                          layer in the Layers palette - below right). 
                        
                         
                          Click 
                          Here To Continue... 
                       | 
                        | 
                     
                     
                        | 
                        | 
                        | 
                     
                     
                      |   | 
                       
                         Previous 
                          Home 
                           Contact Mike   
                        Related Sites 
                           Next 
                         
                        Copyright 
                        © 1998-2016 Mike Doughty, All Rights Reserved Legal 
                        Notices Page Last Revised: October 26, 2016 
                        Privacy Policy 
 
                       | 
                        | 
                     
                   
                 | 
                  | 
                 
                  
				 | 
                   | 
               
             
           | 
         
       
     |