|
|
| |
|
|
 |
| |
| |
|
Intermediate |
|
| |
|
|
Shortcuts
And Pointers For The Pen
|
 |
|
|
|
|
|
|
Pen Tips
Pen Tip No. 1
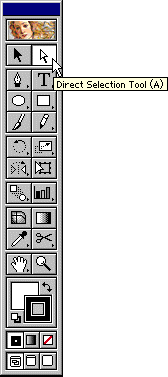
In Adobe® Illustrator®, always click the
Direct Selection tool before clicking and drawing with
the Pen Tool.
First click the Direct Selection Tool
|
Then click the Pen Tool
|
 |
 |
The reason for this is to make sure that when the Ctrl
key (Windows®) is pressed (or Command key for Macintosh®),
that the next selected tool is the Direct Selection Tool
instead of a different, unintended selection tool. While
actively making or modifying a path using the pen, pressing
Ctrl (Windows) or Command (Macintosh) will activate the
last selection tool used. It is more likely that you will
make adjustments to anchor points and control handles
while you are drawing than it is that you will move the
entire path.
Pen Tip No. 2
Tear off the pen tools in Adobe Illustrator and let
it float as its own palette on the workspace.

To do this simply grab the Pen Tool button on the Tool
Palette and drag it away from it. Keep it near your drawing.
Pen Tip No. 3
You can make a simulated connector
point in Adobe Illustrator using the following technique:
In Illustrator 8 First, click
View > Snap To Point
This provides a means to snap points and and control handles
on top of other points. This step is not necessary in
Illustrator 7 because "Snap To Point" is the
default.
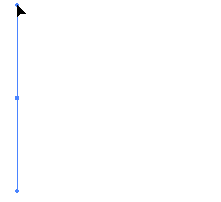
| 1. Drag
the first point |
 |
|
|
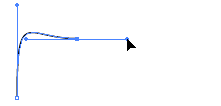
| 2. Drag a second point |
 |
|
|
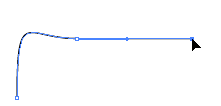
| 3. Click to place a
third point |
 |
|
|
| 4. Grab the handle of
the second point and drag it over the third point. |
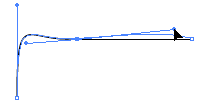 |
|
|
| 5. When the solid arrowhead
cursor changes into a hollow one, the handle is
on top of the point. Release the mouse button. |
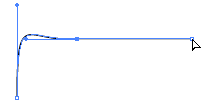 |
|
|
| 6. At this time you
can now change the direction of the first curve
going into the second point. No matter how you adjust
it, there will always be a smooth transition into
the straight line segment. |
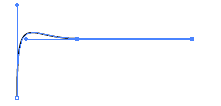 |
|
|
| 7. To reshape the curve,
drag the control handle of the first point. |
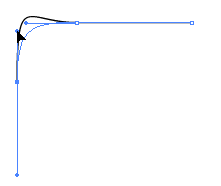 |
|
|
| 8. When the desired
shape is attained, release the mouse button. |
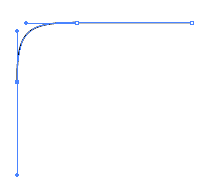 |
The theory behind this tip is by laying the control handle
on top of the third point (the far point in the straight
line segment), it is assured that the curve going into
the second point will be at a tangent to the straight
segment. In Adobe Photoshop®, although there is no
provision for snapping a handle over a point, you could
drag a handle over a point and come close to it.
Pen Tip No. 4
Although Deneba Canvas™ doesn't have a connector
point, it does have an arc tool which places both ends
of an open arc so the tangents are at right angles. This
makes it easy to create the same effect as a connector
point.
To create this effect, first drag out an arc.

Next double-click the arc to place it in edit mode.

Select the point you wish to connect the tangent straight
section. Either drag a marquee around it or click it.

This is what the point looks like when it is selected.

Next select the Curve tool. Press Ctrl-Shift (Windows)
or Command-Shift (Mac) and click to place the endpoint
of the straight section. The tangent line of the point
that connects the straight segment to the curved segment
can be pulled using Shift-Drag to constrain its movement.

Pen Tip No. 5
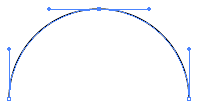
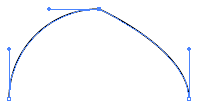
Sometimes you may want a point with only one control
handle. In Deneba Canvas™ 5 and 6, Macromedia®
FreeHand® 8 and CorelDRAW® 8 there are provisions
for making one-handled anchor points. In Adobe Illustrator,
however, you have to drag the handle over its anchor
point to get rid of it:
| 1. The center point
has two handles. Let's get rid of one of them. |
 |
|
|
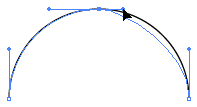
| 2. Drag a handle back
into the point. |
 |
|
|
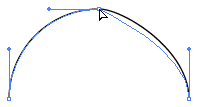
| 3. When the handle is
over the point, the cursor changes from a solid
arrowhead to a hollow one. Release the mouse button. |
 |
|
|
| 4. Now you have a one-handled
anchor point. |
 |
Pen Tip No. 6
Many times you will want to close an open path (Photoshop
users click
here for complete instructions). Sometimes it happens
that you simply get lost while drawing a path and you
find yourself no longer adding points to the path. To
restart a path (append to a path) in Adobe Illustrator,
Macromedia FreeHand or CorelDRAW, the technique is basically
the same.
1. Position the pen (for CorelDRAW users the Bezier Tool
or the Freehand Tool) over an end point in the path you
want to restart. When you first click the tool and before
positioning the cursor over the end point in the path,
the cursor will appear as follows:
 |
Adobe
Illustrator 7 / 8 |
|
|
 |
Adobe
Photoshop 5 |
|
|
 |
Macromedia
FreeHand 8 |
|
|
 |
CorelDRAW
8 - Freehand Tool |
|
|
 |
CorelDRAW
8 - Bezier Tool |
2. Except for CorelDRAW while using the Bezier Tool, when
you are over the point, the cursor will change to let
you know that the next click will append to the path:
 |
Adobe
Illustrator 7 / 8 |
|
|
 |
Adobe
Photoshop 5 |
|
|
 |
Macromedia
FreeHand 8 |
|
|
 |
CorelDRAW
8 - Freehand Tool |
3. That is your cue that the next click will append to
the path. Click once to restart adding line segments to
the path.
4. When you are ready to close the path simply position
the cursor over the other end point of the path. When
the cursor is over the point it will change to let you
know that the next click will close the path:
 |
Adobe
Illustrator 7 / 8 |
|
|
 |
Adobe
Photoshop 5 |
|
|
 |
Macromedia
FreeHand 8 |
|
|
 |
CorelDRAW
8 - Freehand Tool |
|
|
 |
CorelDRAW
8 - Bezier Tool |
5. Click once to close the path.
Deneba Canvas™
With Deneba Canvas, restarting or closing an open path
is very straightforward. To restart (append to) an open
path, simply put the path into edit mode (double-click
using the Selection tool), then select the endpoint you
wish to resume adding segments to, (click to select it)
then select the Curve tool and resume with the next point.
When you want to close the path, when the cursor changes
to a small crosshair, (below). This means the pointer
is directly over an anchor point. The next click (or drag)
closes the path:

To close an open path without adding points, put the path
into edit mode, then click one of the endpoints with the
Curve tool. A new segment will be added joining the endpoints.
Pen Tip No. 7
Here's an undocumented tip for Deneba Canvas. Sometimes
you may want to change the angle of a tangent line without
changing its length. To do this, select an anchor point
and position the mouse pointer just to the right or left
until the cursor changes into a hollow arrowhead:
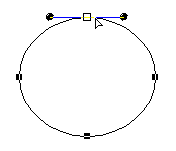
When it does, click and drag the tangent line to change
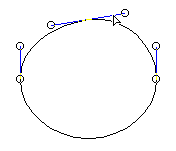
its angle...
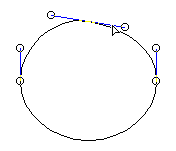
The angle of the handle will change, but not its length.
Click Here To Continue...
|
|
 |
 |
 |
| |
Previous
Home
Contact Mike
Related Sites
Next
Copyright
© 1998-2016 Mike Doughty, All Rights Reserved Legal
Notices
Page Last Revised: October 26, 2016
Privacy Policy
|
|
|
|
|
|
|
|