|
|
Working
With EPS Files in QuarkXPress™ and Photoshop®
- Part One |
 |
|
|
|
|
|
|
I've received a few emails about EPS files and decided
to publish this tutorial to clear up any confusion that
may arise when using them in QuarkXPress or Photoshop.
EPS files are PostScript® and the letters "EPS"
stand for "encapsulated PostScript". There
is some basic data about EPS files in the tutorial found
here in the "Read Me First" section of
the site. This tutorial details some of the aspects
of using EPS files in QuarkXPress or Adobe® Illustrator®.
Adobe Photoshop5.5 was used to create the example EPS
files.
This tutorial covers two points of particular interest:
a.) Why EPS images sometimes appear jagged onscreen
and when printing them out.
b.) An EPS file saved with a clipping path is supposed
to make the background appear transparent (more
on clipping paths here). This tutorial covers why
after making an EPS image with a clipping path, the
background sometimes appears white when placed in a
page layout program.
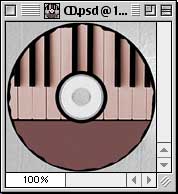
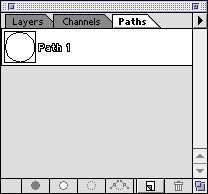
1. For this tutorial we will need to make two simple
EPS files. Start by opening an image in Photoshop, then
create a path to knock out the background (more
on creating paths in Photoshop here). The image
used here is called "CD.psd" and is found
in the Training:Tour folder on the Photoshop CD. Give
the new path a name. The deafult name Photoshop assigns
to the new path is "Path 1".
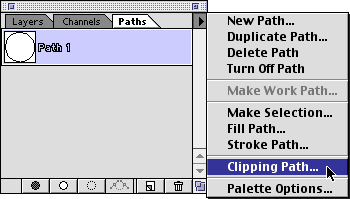
2. Next, assign "Path 1" to be the clipping
path. First make sure the path is selected then click
the small triangle in the upper right corner of the
Paths palette to access the Paths palette menu. Choose
"Clipping Path" from the menu.
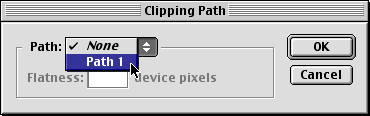
3. In the "Clipping Path" dialog, click the
drop-down menu and select "Path 1". Click
"OK" when done.
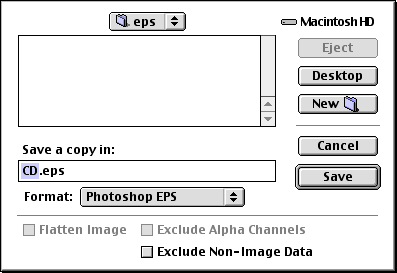
4. Next, click File > Save a Copy. In the
dialog choose "Photoshop EPS" from the Format
drop-down. Give the file a name (in this case name the
file "CD.eps") and click the "Save"
button.
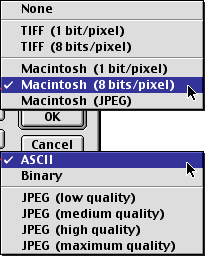
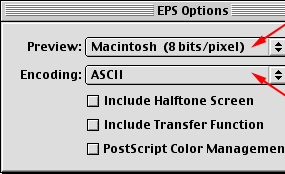
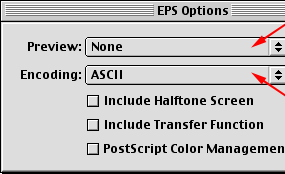
5. The next dialog gives you some choices. The only
two things we're interested in here are the preview
image and the encoding. A preview image is a low resolution
bitmap image which is saved with the EPS data. It can
be either TIFF or PICT format. This example is on a
Macintosh® so we will choose "Macintosh (8
bits per pixel)" (although TIFF would work equally
well on the Mac®). The "Macintosh" choices
use the PICT image format. A preview image allows you
to see the EPS file onscreen for programs that don't
render onscreen graphics using PostScript. It also allows
the printing of a low resolution proof of the EPS file
to a non-PostScript printer.
| Next choose "ASCII"
for the encoding. In this exercise we will open
the EPS file in a text editor. Choosing "Binary"
makes a more compact file. |
|
 |
 |
| |
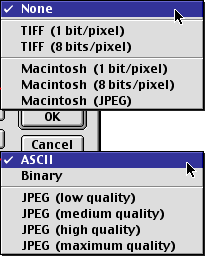
| 6. Repeat steps 4 and
5 and save another EPS file, this time choosing
"None" for the preview. Name this one
"CD no preview.eps". |
|
 |
 |
| |
| |
|
|
 |
|
Note: Please
note that you can save the EPS file with a choice
of color depths (more
here on color depth). In this case we are using
8-bit color (256 colors max). |
Click
Here To Continue...
|