|
|
Canvas™
6 Paint Object Tutorial |
 |
|
|
|
|
|
|
Each paint object created in Deneba Canvas has its
own individual properties such as channels and masks
which move with the object when it is copied or moved
across layers. Each paint object can be arranged in
a stack of objects. There can be vector objects in the
same stack. The following tutorial is a small example
of what you can do with the paint creation and text
tools along with the image filters.
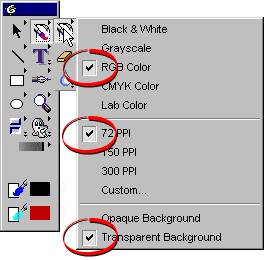
1. The Paint Object Creator tool is located in the upper
right corner of the Toolbox. Click the mouse on the
tool, then move it to the right while still holding
it down. A menu will appear. Click the settings for
new paint objects. Click RGB Color, 72 PPI and Transparent
Background. All new objects created with the tool will
have these properties. You can always change these at
any time.
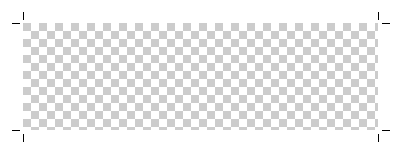
2. Drag the mouse pointer diagonally to create the new
paint object. You can always resize it with the Selection
tool. First make sure the object is not in edit mode
then Ctrl-Drag a handle to crop or expand the object.
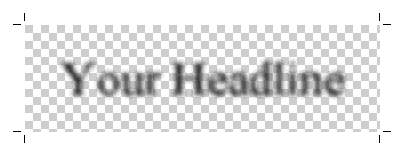
3. When you release the mouse, the new paint object
is in edit mode (the crop marks in the corners will
appear when in edit mode). Note:
The transparent portion of this paint object displays
as a checkerboard pattern because of the preferences
set in this tutorial.
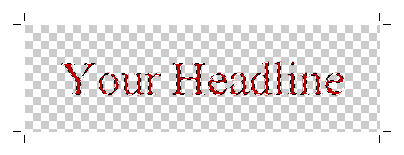
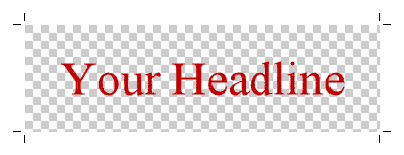
4. You can select the Text tool and type directly on
the object. After typing the last character, press Shift-Home
to select all the characters. Then click the fill ink
of your choice. After you select the color press Esc
(Windows®) or Enter (Mac®)
and the type will be rasterized to the resolution of
the object (in this case 72 ppi). The text will be a
floating selection surrounded by a familiar "marching
ants" marquee. While the selection is floated you
can move it anywhere in the image area.
Note: This technique is an alternate method of creating
a transparent drop shadow effect. See the tutorial
in this section of the site.
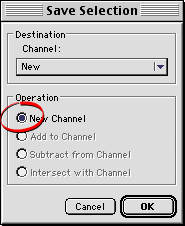
5. To save the selection, click
Image > Select > Save, then choose "New
Channel" in the dialog. When done, click "OK".
6. After you save the selection press Esc (Windows)
or Enter (Mac). That will defloat the selection. This
is a view of the paint object still in edit mode. Note
that it has a selection mask stored as a channel. If
you copy and paste this object, all the channels get
copied with it.
7. Now let's ditch the type. Don't worry, you can always
reload the selection mask and flood fill it with another
color using the Bucket tool - which is just what we're
going to do. First click Image > Select > All,
then press the Delete key.
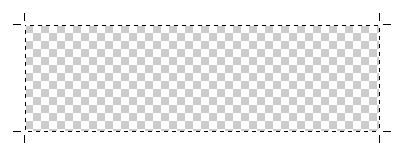
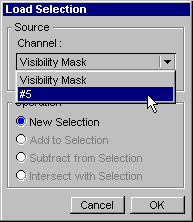
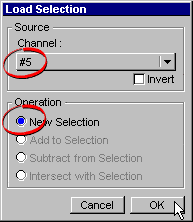
8. Next, click Image > Select > Load and
choose the numbered channel from the pull down in the
dialog. Also click the "New Selection" radio
button, then click "OK".
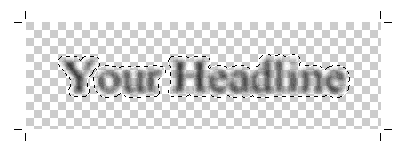
9. Here's a view of the selection marquee.
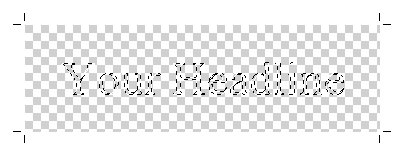
10. Click Image > Select > Feather, then
choose 3 pixels in the dialog. Set the foreground color
to black, then use the Bucket tool  and flood fill the selection. Feathering the selection
creates a soft shadow effect.
and flood fill the selection. Feathering the selection
creates a soft shadow effect.
 |
|
Note: If
the current stroke and fill inks are colors and
not textures, symbols, gradients or hatches, the
current stroke ink becomes the foreground
color when a painting tool is selected,
and the current fill ink becomes the background
color when a painting tool is selected.
If the current stroke and fill inks are textures,
symbols, gradients or hatches, then when a painting
tool is selected, the foreground color becomes black
and the background color becomes white. |
11. Now double-click the Wand tool  and set the tolerance to zero with no anti-aliasing.
Then click anywhere in the transparent section of the
paint object. Next click Image > Select > Inverse.
We are going to save this selection, then make a channel
mask from it. A channel mask is used to make areas of
objects appear transparent without damaging any pixels.
Still, with Canvas 6 you can apply the channel mask
either to a vector object or to a paint object. Save
the selection as in step 5 above.
and set the tolerance to zero with no anti-aliasing.
Then click anywhere in the transparent section of the
paint object. Next click Image > Select > Inverse.
We are going to save this selection, then make a channel
mask from it. A channel mask is used to make areas of
objects appear transparent without damaging any pixels.
Still, with Canvas 6 you can apply the channel mask
either to a vector object or to a paint object. Save
the selection as in step 5 above.
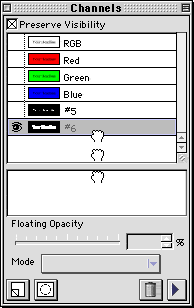
12. Display the Channels palette. You can see the RGB
channels, plus the two selection channels we made (#5
and #6).
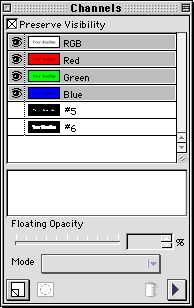
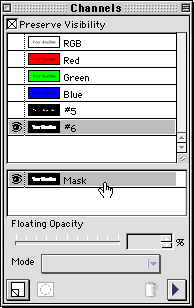
13. Drag channel number 6 into the channel mask slot
and drop it. You just created a channel mask - simple!
14. This is a view of the channel mask.

This was just a sample of what you can do. See the
transparent drop
shadow tutorial in this section of the site for
an easy way to render type as an image.
Click
Here To Continue...
|