| |
|
|
Canvas
6™ Technical Manual Project
Part 2D - Create The Master Pages |
 |
|
|
|
|
|
|
Return
To Technical Manual Project Index
For simplicity I decided to use the grid instead of
the alignment objects. Whether you decide to use the
grid or alignment objects in your own work will depend
on personal preference as well as the complexity of
the project you work on.
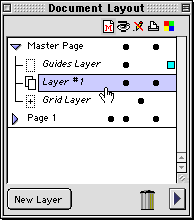
30. Now we are ready to create the remaining master
page objects. Start by using the Document Layout palette
and activate master page layer 1.
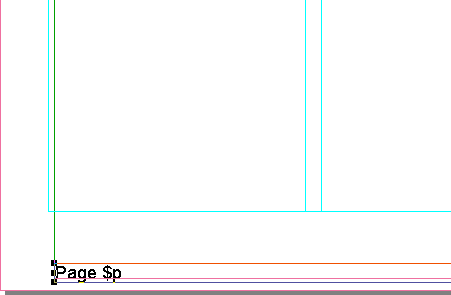
31. Next click Text > Insert > Footer.
Canvas will create a special footer text object and
a text cursor will appear. Type the word "Page"
followed by a space and click Text > Insert >
Page #. With this command Canvas inserts a special
code in the footer that will automatically number each
page.
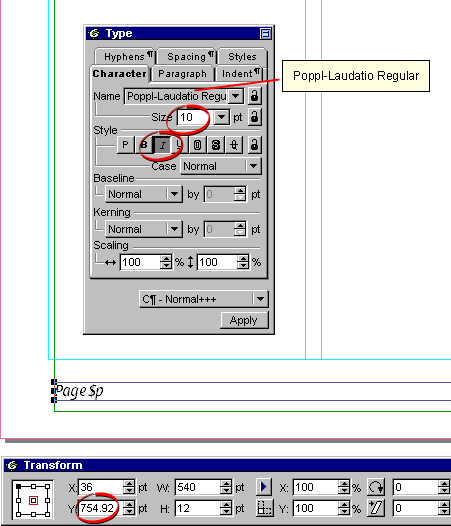
32. Next apply text formatting to the page footer. While
it is still selected, bring up the Type palette and
set the font to 10 point Poppl-Laudatio Regular italic
then click the "Apply" button. Using the Transform
palette, set the y-coordinate to 754.92 points.
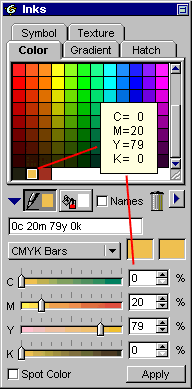
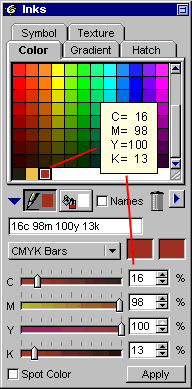
33. We need two additional colors for this project.
Bring up the Inks palette and using the CMYK Bars, create
two new colors with the following specs:
Gold
Maroon |
C=0, M=20, Y=79, K=0
C=16, M=98, Y=100, K=13 |
For more help creating inks, click
here.
 |
 |
34. Using the Line tool  draw a horizontal line at the top of the page from the
left margin to the right margin. Make sure snap-to-grid
is turned on or you have created alignment objects for
the line object to snap to.
draw a horizontal line at the top of the page from the
left margin to the right margin. Make sure snap-to-grid
is turned on or you have created alignment objects for
the line object to snap to.
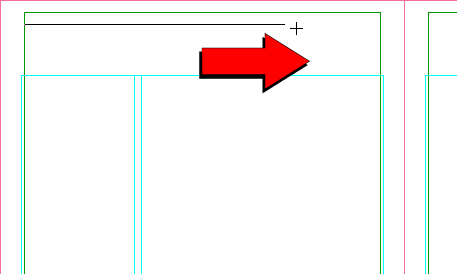
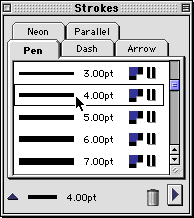
35. Bring up the Strokes palette and give the new line
a 4-point stroke.
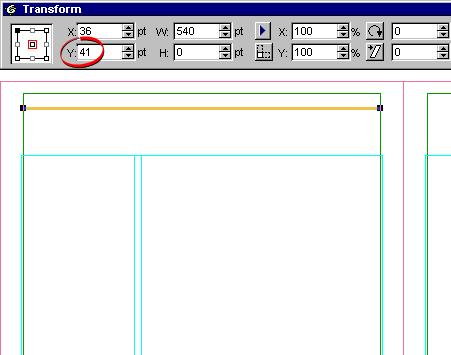
36. Using the Inks palette, give the new line a pen
ink using the new gold color. Then with the Transform
palette, enter 41 points for the y-coordinate. Next
click Edit > Replicate one copy with an offset
of zero (alternately use Edit > Duplicate
with drawing
preferences set for no offset). Send this new line
object to back by clicking the "Send To Back"
button on the toolbar, or by clicking Object >
Arrange > Send To Back.
37. With the duplicate line object still selected, give
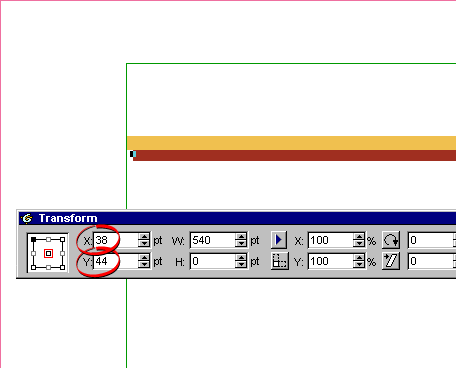
it a pen ink using the new maroon color. Enter an x-coordinate
value of 38 points and a y-coordinate value of 44 points
in the Transform palette. Below is a close-up view of
the pair of line objects.
Click
Here To Continue...
|
|