|
|
Vectorize
a Logo From an Image |
 |
|
|
|
|
|
|
Part III: Cleanup The Tracing and Finish The Butterfly
39. In this step I opened the file in Adobe® FreeHand®.
40. Next, I clicked File > Save As and saved the file as "butterfly
half.fh11 - in FreeHand® format. Please view the short QuickTime® movie.
First I clicked View > Snap To Point, then I simply selected nearby
points, joined them together until they snapped (on the Macintosh® you
will hear the snapping sound if you have sounds turned on). Once I joined the
points together I usually selected the joined point and with the Option key
held down (on the Macintosh® - that would be the Alt key in Windows®)
I dragged out a control handle in the opposite direction, then clicked the
Smooth point button in the Object Inspector to convert the corner point to
a smooth point, then adjusted th handles to smooth out the curve. Although
the QuickTime® movie only shows a few examples, you should get the idea.

Commands used in the movie: Macintosh to Windows translations
| Macintosh |
Windows |
Command |
| Option+drag |
Alt+drag |
Drag out a new handle from an anchor point |
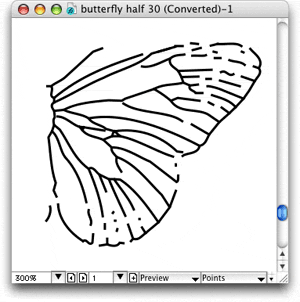
41. When all the cleanup work is done in Adobe® FreeHand® the
finished butterfly half should look something like
the example below.

42. Next, I will need to copy the butterfly half and flip it horizontally then
join the two halves together. But first, I want to be sure that the two halves
line up correctly. For this step I will import the original GIF image of
the logo to use as a template, aligning it the to the half of the butterfly.
Once positioned, I will send the image to the background layer. Then I will
duplicate the butterfly half, then flip it horizontally with the FreeHand "Reflect" command,
then align it with the template. Please view the short QuickTime® movie.
Again, make sure you have turned on Snap To Point, as in a previous step.

Commands used in the movie: Macintosh to Windows translations
| Macintosh |
Windows |
Command |
| Cmd+A |
Ctrl+A |
Select All |
| Cmd+G |
Ctrl+G |
Group selected objects |
Click
Here To Continue...
|